📌 TL;DR
End-to-end encryption isn’t just about keeping secrets from attackers — it’s about building systems where users don’t have to trust anyone but themselves, including the service provider (i.e., the server).
In this series, we’ll build a simple E2E encrypted communication system that is post-quantum secure using Rust and the libsignal library from the Signal team.
In Part 1 (this post), we’ll cover:
- 🎯 Why E2E encryption matters (security vs privacy vs trust)
- 🔐 What the Signal Protocol offers
- 🏗️ How Post-quantum secure key exchange (PQXDH) works
- 🧠 Theory behind post-quantum cryptography
By the end of this 3-part series, you’ll have implemented:
- ✅ Post-quantum secure key exchange (PQXDH)
- ✅ End-to-end encrypted file sharing
- ✅ A working demo that encrypts and decrypts a file, e.g. an image
Code coming in parts 2 and 3!
The Problem: Learning E2E Encryption is Hard
These days, I’ve been working on building an end-to-end encryption system for SyftBox — an open-source network for privacy-first, offline-capable AI. However, when I started researching how to implement it based on libsignal, I felt like hitting a wall.
The Signal Protocol is the gold standard for
implementing E2E encryption systems—it’s what powers Signal, WhatsApp, and many other secure messaging apps.
However, the whitepaper is highly technical and rigorous, making it difficult to understand without
a strong cryptography background. I was trying to search for good learning materials that
bridge theory and practice, but couldn’t find anything that really clicked. So I spent time
diving deep into the protocol, implementing it, and visualizing all the concepts to truly understand how it works.
This series shares what I learned, and my goal is to help you save time understanding and
implementing your own E2E encryption system using libsignal, with clear explanations and visual aids along the way.
Security vs Privacy: Understanding the Difference
While security protects you against external eavesdroppers and attackers, privacy refers to your right to control how your personal information is collected, stored, and used.[1] This distinction is crucial when comparing TLS (the technology behind HTTPS) and end-to-end encryption:
- TLS provides security against external threats but still allows the service provider (server) to access your data
- E2EE delivers true privacy by ensuring that not even the service provider can read your messages—only you and your intended recipient hold the keys.
TLS vs E2EE: A Visual Comparison

In the diagram above:
- Traditional TLS Encryption (left): The server decrypts and re-encrypts messages, meaning it can read your communications. This protects against external attackers but not against the service provider itself.
- End-to-End Encryption (right): The server only forwards encrypted data without being able to decrypt it. Only Alice and Bob can read the messages, giving you both security and privacy.
🤔 Why does the server need to decrypt and re-encrypt with TLS?
The server keeps separate encryption keys with Alice and with Bob. When Alice sends a message, the server decrypts it using Alice’s keys, then re-encrypts it using Bob’s keys. This means the server sees the plaintext message in between—protecting you from network hackers, but not from the service provider itself.
The Signal Protocol: Battle-Tested E2E Encryption
We will build our E2E encryption system based on Signal Protocol - the gold standard for E2E encrypted messaging:
- Used by Signal (obviously), WhatsApp, Facebook Messenger, Google Messages
- Protects billions of messages every day
- Open source and academically vetted
Why Signal Protocol?
- Forward Secrecy - New keys for every message
- Asynchronous - Works even when recipients are offline
- Authenticated - You know who sent each message
- Deniable - Can’t cryptographically prove who said what
- Post-Quantum Ready - Updated to include Kyber for quantum resistance
What is PQXDH?
PQXDH (Post-Quantum Extended Diffie-Hellman) is Signal’s latest key agreement protocol, designed to resist quantum computers. It’s currently implemented in the libsignal library (as of Nov 2025) and will be the foundation of our E2E encryption system.
The basic idea:
- Alice and Bob each have several keys (identity, signed prekeys, quantum keys)
- They perform multiple Diffie-Hellman exchanges
- They combine the results into a shared secret
- This secret is used to derive encryption keys
We’ll implement a simplified 3-key version in this series (we skip the optional one-time prekeys)
Understand PQXDH: A Step-by-Step Visual Guide
Let’s break down the PQXDH protocol into digestible phases. We’ll build up understanding piece by piece, then see the complete picture at the end.
Phase 1: Bob Sets Up His Keys
Before Alice and Bob can communicate securely, Bob needs to prepare and publish his cryptographic keys to the server.

Bob publishes a key bundle containing:
-
Identity Key (IKB) - Bob’s long-term public key. Proves Bob’s identity (like Bob’s passport)
- Like Bob’s permanent cryptographic signature
- Used to verify it’s really Bob
- Ed25519 key pair
-
Signed Prekey (SPKB) - Medium-term key for key agreement. Enables secure key exchange (like a temporary key card)
- Should be rotated periodically (e.g., weekly)
- Signed by Bob’s identity key to prove authenticity
- X25519 key pair for Diffie-Hellman
-
Post-Quantum Prekey (PQPKB) - Quantum-resistant key. Protects against quantum computers (future-proofing)
- Also signed by Bob’s identity key
- Kyber1024 public key for post-quantum security
- Protects against future quantum computer attacks
-
One-time Prekeys (optional) - Single-use keys for extra security
- EC one-time keys (OPKB1, OPKB2, …)
- PQ one-time keys (PQOPKB1, PQOPKB2, …)
- We’ll skip these in our implementation
Bob uploads his key bundle to the server, which stores it. The server doesn’t know Bob’s private keys—only his public keys. Anyone (like Alice) can now fetch Bob’s public keys to initiate a secure conversation with him.
📓 Note
In our implementation, we’ll focus on the 3-key version and skip the optional one-time prekeys:
- Identity key (IKB)
- Signed prekey (SPKB)
- PQ prekey (PQPKB)
This gives us all the essential security properties while keeping the code simpler to understand.
Also, all public keys have a corresponding private key.
Phase 2: Alice Computes the Shared Secret
Now that Bob’s keys are available on the server, Alice wants to send an encrypted message to Bob. First, she needs to fetch Bob’s key bundle and establish a shared secret that only she and Bob know.

Here’s what Alice does:
Step 1: Fetch Bob’s Key Bundle
Alice retrieves Bob’s public keys from the server:
- Identity key (IKB)
- Signed prekey (SPKB)
- Post-quantum prekey (PQPKB)
and verifies all the signatures on the keys.
Step 2: Generate Her Own Keys
Alice generates:
- Identity key pair (IKA) - Her long-term identity
- Ephemeral key pair (EKA) - A fresh, temporary key just for this conversation (note that this is different than the optional one-time prekeys)
Step 3: Perform Multiple Diffie-Hellman (DH) Exchanges
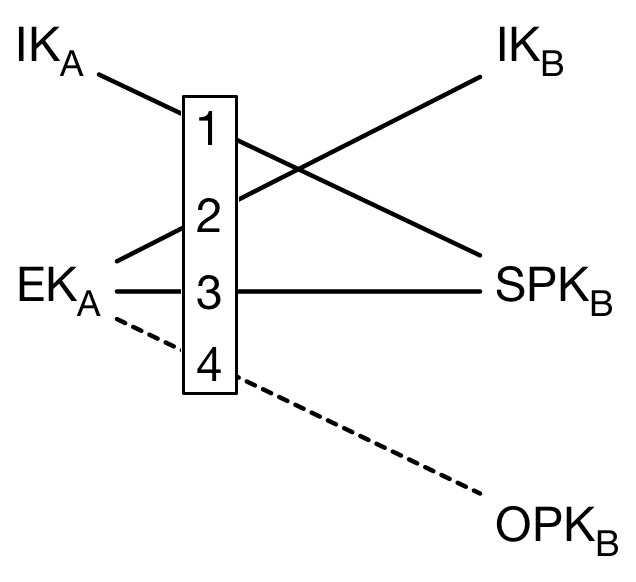
Alice combines her keys with Bob’s keys through multiple DH operations:
-
DH1 = DH(IKA_priv, SPKB_pub) - Alice’s identity private key × Bob’s signed public prekey
- Provides mutual authentication
- Bob can verify it’s really Alice
-
DH2 = DH(EKA_priv, IKB_pub) - Alice’s ephemeral private key × Bob’s identity public key
- Provides mutual authentication from the other direction
- Alice can verify it’s really Bob
-
DH3 = DH(EKA_priv, SPKB_pub) - Alice’s ephemeral private key × Bob’s signed public prekey
- Provides forward secrecy
- Even if long-term keys are compromised later, this conversation stays secret
Step 4: Add Post-Quantum Protection
Alice uses Bob’s quantum-resistant key with a Post-Quantum Key Encapsulation Mechanism (PQKEM):
- (CT, SS) = PQKEM-ENC(PQPKB) - Encapsulate a shared secret using Bob’s PQ public key
- Returns a tuple: CT (ciphertext) and SS (shared secret)
- This protects against future quantum computers (IND-CCA post-quantum security)
- Only Bob can decapsulate using PQKEM-DEC(PQPKB_priv, CT) to recover the shared secret SS
Step 5: Combine Everything into a Shared Key
Alice feeds all the DH results and the quantum secret into a Key Derivation Function (KDF):
This SK (Shared Key) is now the secret Alice and Bob share. Alice will use it to encrypt her message.
At this point:
- Alice has computed the shared secret SK
- Bob doesn’t know SK yet (he’ll compute it later when he receives Alice’s message)
- Alice is ready to encrypt and send her initial message
Phase 3: Alice Sends the Initial Encrypted Message
Alice now has the shared key SK. She can encrypt her message and send it to Bob through the server.

Step 1: Create Associated Data
Alice constructs additional authenticated data that binds the encryption to both parties’ identities:
This prevents man-in-the-middle attacks—the encryption is cryptographically tied to Alice and Bob’s specific identities.
Step 2: Encrypt the Message
Alice encrypts her plaintext message using an AEAD (Authenticated Encryption with Associated Data) scheme:
AEAD provides both:
- Confidentiality: Only someone with SK can decrypt
- Authenticity: Any tampering with the ciphertext or AD is detected
Step 3: Construct the Initial Message
Alice creates a message bundle containing everything Bob needs to derive the same SK and decrypt:
Initial Message = {
  IK_A,              // Alice's identity public key
  EK_A,              // Alice's ephemeral public key
  CT,                // PQ ciphertext from PQKEM-ENC
  identifiers,       // Which of Bob's prekeys Alice used
  ciphertext         // The encrypted message
}
Step 4: Send to Server
Alice sends this initial message to the server, which forwards it to Bob.
🤔 What’s in the initial message and why?
- IKA and EKA: Bob needs Alice’s public keys to compute the same DH values
- CT: Bob needs this to decapsulate the PQ shared secret SS
- Identifiers: Tell Bob which of his prekeys to use (in case he has multiple)
- Ciphertext: The actual encrypted message
Notice what’s NOT sent: the shared key SK or the plaintext message. The server only sees encrypted data and public keys.
At this point:
- Alice has sent her encrypted message
- The server can forward it but cannot read it
- Only Bob (with his private keys) can decrypt the message
- Alice and Bob now share a secret communication channel
Phase 4: Bob Receives and Decrypts Alice’s Message
Finally, Bob receives Alice’s encrypted message and can decrypt it to read the plaintext.

Here’s what Bob does:
Step 1: Receive the Initial Message
The server forwards Alice’s initial message to Bob. Bob extracts:
- IKA - Alice’s identity public key
- EKA - Alice’s ephemeral public key
- CT - The PQ ciphertext
- identifiers - Which prekeys Alice used
- ciphertext - The encrypted message
Step 2: Load the Correct Private Keys
Bob uses the identifiers to determine which of his private keys to use:
- Load IKB_priv - His identity private key
- Load SPKB_priv - Bob’s signed private prekey key
- Load PQPKB_priv - Bob’s post quantum last-resort private prekey
Step 3: Perform the Same DH Operations
Bob performs the exact same Diffie-Hellman exchanges as Alice, but using his private keys:
- DH1 = DH(IKA_pub, SPKB_priv) - Alice’s identity public key × Bob’s signed private prekey
- DH2 = DH(EKA_pub, IKB_priv) - Alice’s ephemeral public key × Bob’s identity private key
- DH3 = DH(EKA_pub, SPKB_priv) - Alice’s ephemeral public key × Bob’s signed private prekey
Because of how Diffie-Hellman works, Bob gets the exact same values that Alice computed:
- DH(IKA_pub, SPKB_priv) = DH(IKA_priv, SPKB_pub)
- DH(EKA_pub, IKB_priv) = DH(EKA_priv, IKB_pub)
- DH(EKA_pub, SPKB_priv) = DH(EKA_priv, SPKB_pub)
Step 4: Decapsulate the PQ Shared Secret
Bob uses his PQ private key to decapsulate the shared secret from the ciphertext:
This recovers the same SS that Alice generated during encryption.
Step 5: Derive the Same Shared Key
Bob feeds all the DH results and the quantum secret into the same KDF:
Bob now has the exact same SK that Alice computed—without ever transmitting it over the network!
Step 6: Reconstruct the Associated Data
Bob reconstructs the same associated data:
Step 7: Decrypt the Message
Bob decrypts using the AEAD scheme:
If the decryption succeeds:
- Bob has successfully recovered Alice’s message
- The authentication check passed (proving it really came from Alice)
- No one else could have read the message (not even the server)
🎉 Mission Accomplished!
Alice and Bob have successfully established end-to-end encrypted communication:
- ✅ Mutual authentication - Both parties verified each other’s identities
- ✅ Forward secrecy - Even if long-term keys leak later, this conversation stays secret
- ✅ Post-quantum security - Protected against future quantum computers
- ✅ Zero knowledge server - The server never saw the plaintext or shared key
- ✅ Asynchronous - Worked even though Bob was offline when Alice sent the message
At this point:
- Bob has Alice’s plaintext message
- They share a secure communication channel
- Neither the server nor any eavesdropper can read their messages
Complete PQXDH Protocol Overview
Now that you understand each phase in detail, here’s the complete picture showing how all four phases work together:

This diagram shows the entire flow from Bob publishing his keys, through Alice computing the shared secret and sending her encrypted message, to Bob decrypting and reading the message. Each component works together to provide mutual authentication, forward secrecy, and post-quantum security.
What’s Next?
In Part 2, we’ll roll up our sleeves and implement the PQXDH protocol in Rust using libsignal. We’ll learn how to:
- Set up the Rust development environment with libsignal
- Generate and manage cryptographic keys
- Implement the complete key exchange flow
- Build a working proof-of-concept
In Part 3, we’ll create a practical demo application that encrypts and shares files end-to-end using everything we’ve built.
References
- Signal. “The PQXDH Key Agreement Protocol.” Signal Specifications.
- Signal. “libsignal - Signal Protocol library.” GitHub Repository.
- Okta. “Privacy vs. Security: What’s the Difference?” Okta Identity 101.